How Metal Part get its shape? Maybe it’s a car part or a piece of a machine. One way to make metal parts is called casting. In casting, you melt metal, pour it into a form, let it cool, and then you have your part. This blog will tell you about two popular ways to make these forms: Shell Molding and Green Sand Casting.
- What Is Casting?
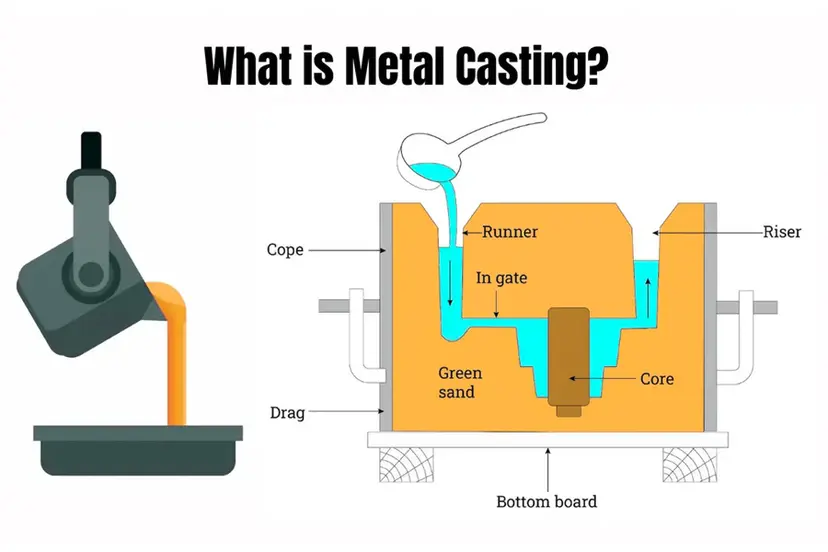
First, you make a shape (pattern). Then you press that shape into a soft material to make an empty space (mold). Next, you pour hot, melted metal into that space. When the metal cools and gets hard, you break the mold and find your metal part inside.
- Pattern: The model of the part you want. You press it into the material to make the mold.
- Mold or Form: The hollow space where you pour hot metal.
- Core: A piece of sand or other material that goes inside the mold to make holes in the part.
- Flask: The box that holds the mold. In green sand casting, it has two halves called cope (top) and drag (bottom).
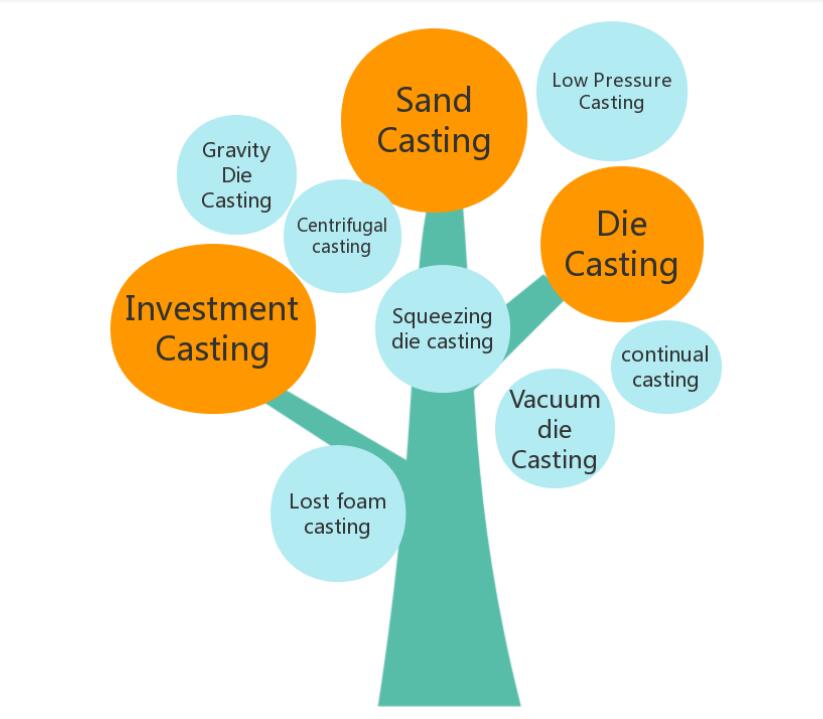
There are many casting methods like…
- Green sand casting
- Furan resin sand casting
- Lost foam casting
- Investment casting
- Die casting
- Permanent mold casting
And Many More…
Every type of casting uses these ideas, but each method uses a different way to make the mold.
Shell Molding vs Green Sand Casting
Shell Molding
What Is Shell Molding?
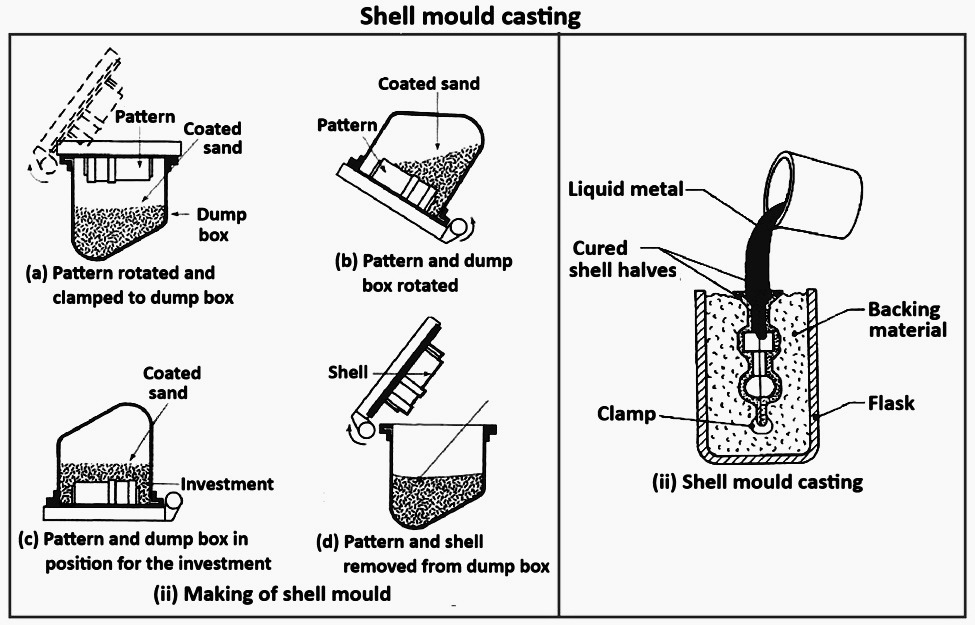
Shell Molding is a way to make a mold using sand mixed with a sticky liquid called resin. You heat a metal pattern, dip it into this sand-resin mix, and the sand sticks to the pattern and forms a thin shell. That shell is your mold.
Why Use Shell Molding?
- You want parts that look smooth, almost like they came straight out of a machine shop.
- You want parts that are very close to the exact size you need.
- You need small to medium parts that are a bit fancy in shape.
- You don’t want to spend a lot of time smoothing the part later.
Question: Have you ever seen a metal bracket or cover that looked almost polished right away? That might be made by shell molding.
How Shell Molding Works
-
Heat the Metal Pattern
- Put a metal pattern (a model of the part) in an oven.
- Heat it to about 175–260 °C (like a hot baking oven).
-
Dip in Resin-Coated Sand
- Pull the hot pattern out.
- Dip it into a box of sand that has a thin layer of resin on each grain.
- A thin layer of sand sticks to the hot pattern and gets a little hard.
-
Bake the Sand Shell
- Take the sand shell off the pattern.
- Put that shell in an oven again for a short time. This makes it strong all the way through.
- Do this for both top and bottom halves of the mold.
-
Put the Shell Halves Together
- If you need holes, put in sand cores first.
- Clamp the top and bottom shell halves around the cores.
- Place the shell in a box with loose sand or another material to hold it in place.
-
Pour the Hot Metal
- Clamp the box tight so it does not move.
- Pour hot metal (like iron, steel, or aluminum) into the shell through small channels called gates.
-
Break and Clean
- When the metal cools, break the shell (you use each shell only once).
- Brush or blast off extra sand and any gates or risers (extra metal bits).
- Do any final sanding or trimming to make the part ready.
Tip: The thin shell can look almost like a plastic mold. That is why the part can come out smooth.
Good and Bad Points of Shell Molding
Good Points
- Very Accurate Size (CT VALUE?)
– The part is almost exactly the size you want. Maybe just half a millimeter off.
- Smooth Surface
– The part can look smooth right out of the mold (0.8–1.6 micrometers roughness).
- Fancy Shapes
– You can make thin walls (2–3 mm thick) or small details easily.
- Less Hand Work
– Machines and ovens do most of the work, so people do less packing and trimming.
- Same Quality Every Time
- The metal pattern does not change, so each shell is the same.
Bad Points
- Higher Cost
– The resin, sand coating, and ovens cost more than plain sand.
- Part Size Limit
– Usually only good for small to medium parts (up to 20–30 kg).
- Resin Smoke
– When the resin burns, it makes smoke. You need good fans and filters.
Examples of Shell Molding in Real Life
* Small car parts like engine brackets or transmission covers.
* Pump bodies or valve parts for factories.
* Parts that need to look nice and fit just right without much sanding.
Questions to Think About
* Do you need a part that looks smooth right away?
* Do you want tight size control so you can skip a lot of extra work?
* Can you spend a bit more on the mold to save time later?
Green Sand Casting
What Is Green Sand Casting?
Green Sand Casting is a simple way to make a mold using wet sand. Green does not mean the color; it means the sand is wet, not dry. You pack wet sand around a pattern to make the mold.
Types of Green Sand Molding Processes
Green sand refers to a mixture of silica sand, clay (18–30%), and water (6–8%) used for making molds in foundries. The specific method of creating and handling green sand molds varies depending on machinery, automation level, and desired casting quality.
Below are the main types of green sand molding methods, including Arpa, high-pressure, manual, and jolter processes, followed by a comparison highlighting their differences.
-
Arpa (Jolt Squeeze) Molding
– Process: Uses a jolt-squeeze machine, which first jolts the mold to compact sand into the pattern, then applies squeeze pressure to further compress the sand.
– Characteristics:
– Suitable for medium to large castings.
– Combines both jolt (vibration) and squeeze actions for improved density.
– Box sizes and weight capabilities vary depending on machine models (e.g., ARPA 300, ARPA 450, ARPA 900, ARPA 1300).
– Commonly used for short- to medium-run flexibilities in foundries
– Typical Applications: Flexible and cost-effective for a wide range of cast parts in foundries needing adaptability.
-
High Pressure Green Sand Molding
– Process: Fully automated lines use high-speed and high-pressure compaction to form extremely dense and uniform molds.
– Characteristics:
– Delivers consistent mold hardness, improving dimensional accuracy.
– Suited for mass production; handles production rates up to hundreds of molds per hour.
– Requires specialized, capital-intensive machinery and infrastructure.
– Reduces labor requirements vs. manual/jolt squeeze systems
– Typical Applications: Automotive, industrial, and large-scale casting with strict quality controls.
-
Manual Green Sand Molding
– Process: The mold is rammed manually using handheld tools or simple presses, without advanced machinery.
– Characteristics:
– Low equipment investment and technical requirement.
– Offers high flexibility for small batches, jobbing work, prototypes, or complicated shapes.
– Production rate and consistency are highly operator-dependent, with lower possible hardness and density.
– Typical Applications: Small foundries, educational settings, or prototyping.
-
Jolter (Jolt-only) Green Sand Molding
– Process: Molds are compacted by rapid vertical movement (jolting), causing sand to settle around the pattern by gravity and vibration.
– Characteristics:
– Simpler than jolt-squeeze; provides moderate compaction.
– Lower mold density compared to squeeze or high-pressure processes.
– Less investment than squeeze or fully automated systems.
– Typical Applications: Small to medium castings, where moderate compaction is sufficient.
Why Use Green Sand Casting?
– You want to make big and heavy parts (maybe hundreds of kilos).
– You want to spend the least money on mold materials.
– You don’t mind a bit more extra work to fix the part later.
– You need to make a lot of simple shapes fast.
Question: Have you ever seen a giant engine block for a truck? That often comes from green sand casting.
How Green Sand Casting Works
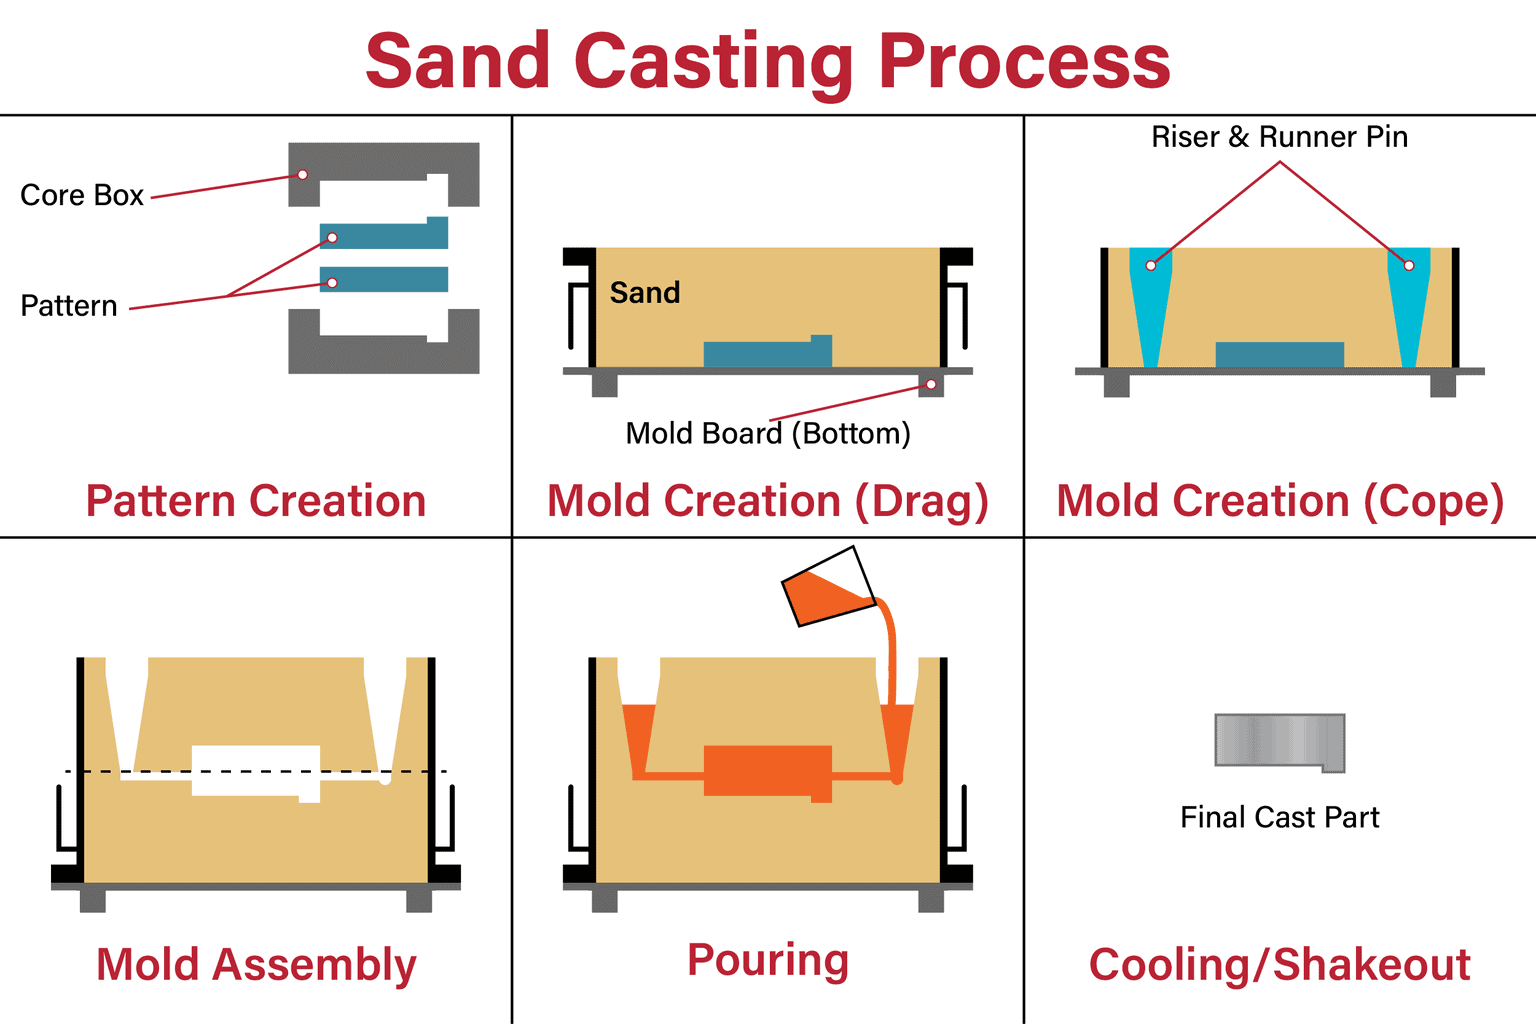
- Place the Pattern on a Board
- Put a pattern (the shape of the part) on a flat board or match plate.
- Pack the Bottom Sand (Drag)
- Put a flask (a box) on top of the board. This is the drag (bottom).
- Fill the flask with wet sand (sand, clay, and water mixed).
- Press or ram the sand down so it is firm around the pattern.
- Flip and Remove Pattern
- Turn the flask over so the pattern is on top.
- Lift the board off, leaving the pattern in the sand.
- Pack the Top Sand (Cope)
- Put another flask (the cope, or top) on the drag.
- Fill and ram wet sand around the pattern again.
- Put in sand cores if you need holes in the part.
- Cut Gates and Risers
- Cut small channels (sprues) for metal to flow in.
- Cut risers so air and gases can escape.
- Pour the Hot Metal
- Clamp the cope and drag together.
- Pour hot metal (iron, steel, or aluminum) into the sprue.
- Cool and Shake Out
- Wait for the metal to cool and get hard.
- Open the two flasks and break away the sand to reveal your part.
- Trim off gates, risers, and any rough edges.
Tip: The water in the sand helps keep the hot metal from making too many holes. If the sand is too dry or too wet, the part can get cracks or bubbles.
Good and Bad Points of Green Sand Casting
Good Points
- Low Cost
– Sand, clay, and water are cheap. No need for resin or big ovens.
- Can Make Big Parts
– You can cast parts that weigh hundreds of kilos, like machine bases.
- Reuse the Sand
– After you break out the part, you can clean and use the sand again.
- Ideal of Mass Production
– You can make lots of basic parts quickly if you have a big sand pit.
Bad Points
- Less Accurate
– Parts can be off by 2–5 mm, so you need extra trimming or machining. (Mention CT value. HPML has casting tolerance 1-1.5 mm)
- Rough Surface
– The part surface is rough (3–6 micrometers). You see the sand grain.
- No Tiny Details
– It is hard to make thin walls or very small shapes because the sand is coarse.
- More Hand Work
– People pack the sand, cut the gates, and trim parts by hand.
- Watch the Water
– Too much water can cause steam bubbles. Too little water can make the sand not stick.
Examples of Green Sand Casting in Real Life
* Large engine blocks for cars and trucks.
* Big machine bases and frames.
* Valves, pump housings, and simple iron parts for factories.
Questions to Think About
* Do you need a big, heavy part that does not have to be super precise?
* Do you want to spend the least money on sand and molds?
* Will you do extra work later to smooth and shape the part?
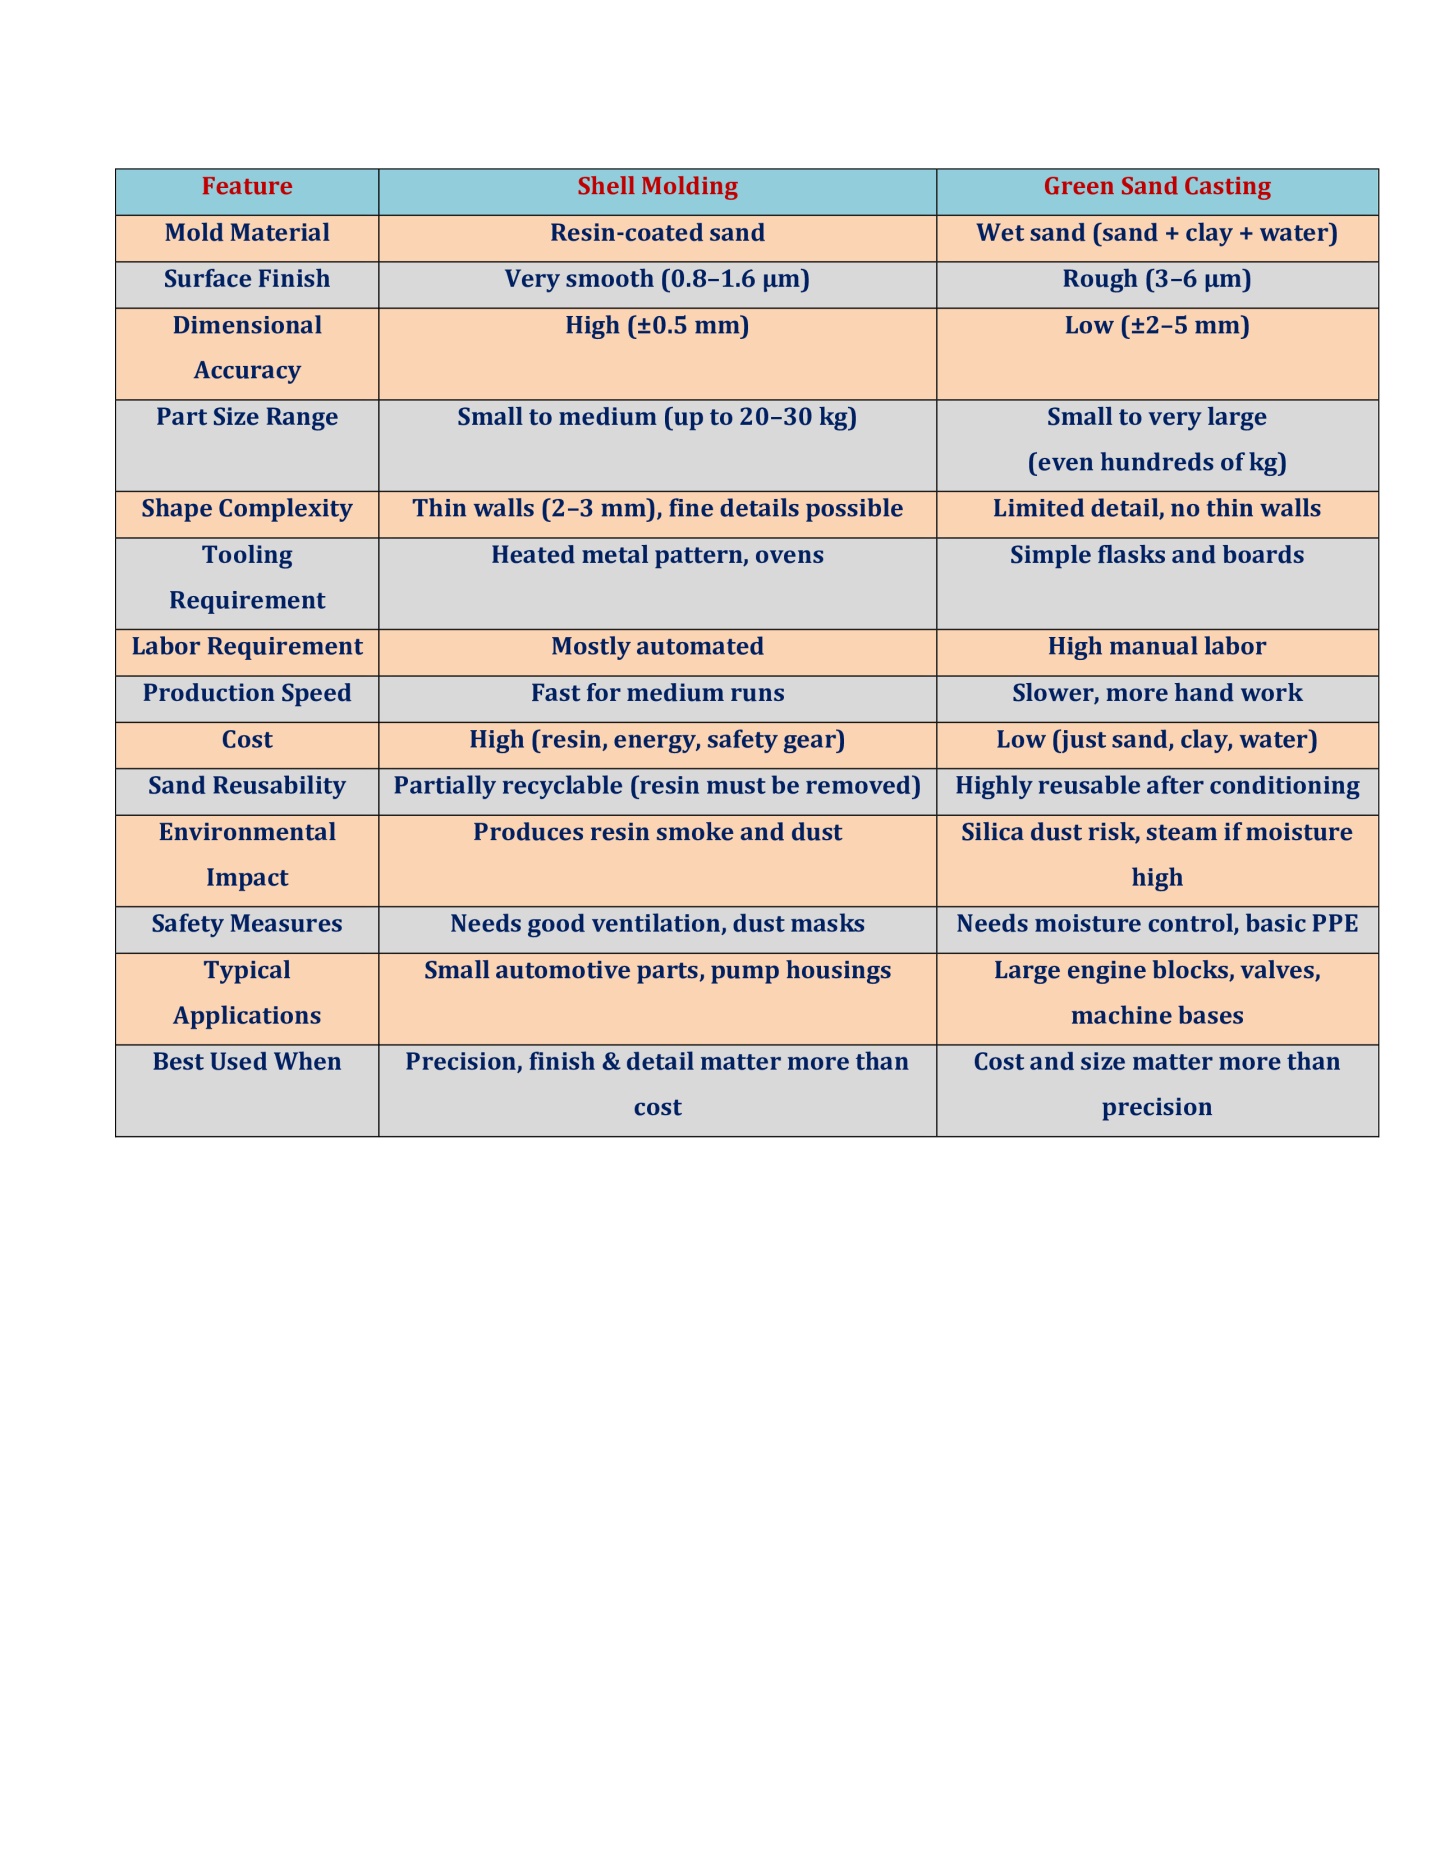
How They Are Different
- Size and Shape Accuracy
* Shell Molding: Parts are almost exactly the size you want (within 0.5 mm). They come out smooth and need little work.
* Green Sand Casting: Parts can be off by 2–5 mm. They come out rough and need more trimming or machining.
Question: Is it okay if your part is a little off, or do you need it to be just right?
- Cost and Speed
* Shell Molding:
– Faster to make a mold because machines and ovens do most work.
– Costs more because of resin and ovens.
– Good for medium runs (hundreds to a few thousand parts).
* Green Sand Casting:
– Slower because people pack sand by hand.
– Costs less-just sand, clay, and water.
– Good for large runs or big parts. (phrase better, not in the negative way)
Question: Do you have more money to spend on the mold, or do you want to save money on sand?
- Shape Complexity
* Shell Molding:
– Can make thin walls (2–3 mm) and small details like letters or logos.
– Needs very small angles (about 1°) so the shell can lift off the pattern.
* Green Sand Casting:
– Cannot do tiny details because the sand is coarse.
– Needs bigger angles (3–5°) so the sand can lift off the pattern easily.
Question: Do you need little holes and thin walls, or are big, chunky shapes okay?
- People and Machines You Need
* Shell Molding:
– You need an oven to heat the pattern.
– You need to handle resin safely (wear masks and gloves).
– Machines do most of the work—less manual labor.
* Green Sand Casting:
– You need simple flasks (boxes) and a sand mixing area.
– Skilled workers pack the sand and trim parts by hand.
– More manual steps but no fancy machines needed.
Question: Do you have ovens and resin tools, or just a sand pit and shovels?
- Safety and the Planet
* Shell Molding:
– Burning resin makes smoke and small dust. You need good air flow and dust masks.
– The used shells become waste, but you can recycle some sand.
* Green Sand Casting:
– Wet sand makes less dust, but silica dust still comes up when it dries.
– If there is too much water, steam pockets can cause small explosions in the mold. You need to watch moisture.
Question: Are you ready to handle small dust and fumes, or do you prefer a wetter process with less smoke?
-
When to Choose Which Method
* Choose Shell Molding if:
– You want small to medium parts that need to be very precise.
– You want a smooth finish so you do not have to sand the part much.
– You have money to spend on resin, ovens, and a bit of extra safety gear.
– You need fine shapes and thin walls.
* Choose Green Sand Casting if:
– You want big or heavy parts that do not need to be super precise.
– You want to spend as little as possible on mold materials.
– You have a big sand pit and people who can pack sand by hand.
– You do not need a super smooth finish right away.
* Some Extra Tips for Casting
- Check Your Pattern Care
- Keep your metal pattern clean. Every little scratch can change the mold shape.
- For shell molding, keep the pattern temperature just right. Too hot or too cold can make bad shells.
- Watch Moisture in Green Sand
- Use about 2–4% water by weight. You can see this by feeling the sand. It should clump but not drip.
- If it is too wet, you get steam holes. If it is too dry, the sand crumbles and the mold breaks.
- Think About Venting
- In both methods, you need vents or risers for air and gases. Otherwise, the metal cannot fill the mold all the way.
- In shell molding, vents come from the shell itself and any added vents.
- In green sand casting, you cut risers and vents by hand or with simple tools.
- Plan for Cleanup
- Shell molding makes a thin shell you break away. That shell is waste, but you can recycle the sand inside if you have a way to strip out the resin.
- Green sand can go back into your sand mix after you clean and recondition it.
- Safety First
- Wear gloves, masks, and goggles. Hot metal and dust can hurt you.
- Use good ventilation if you work with resin or get a lot of dust.
- Keep a fire extinguisher nearby when pouring metal.
Casting is like magic: you pour hot metal, let it cool, and you have a new part. If you want a part that is almost perfect and smooth right away, shell molding is great. If you need big, heavy parts and want to spend less on molds, green sand casting is a smart choice.
Ask yourself:
* Do I need my part to be very exact, or can it be a little off?
* Do I need thin walls and small details, or are big shapes fine?
* Do I have ovens and safety gear for resin, or just sand and boxes?
* Do I want to spend more on mold materials or save money with simple sand?
Answer these, and you will know which way to cast.
Shell Molding vs Green Sand Casting
Thanks for reading!
Let us know if you have any casting related queries. Our team will be helpful Contact Esteem Auto for Further Discussion