
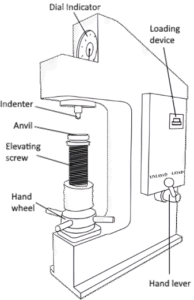
In the Rockwell hardness test, the depth of the mark left by the indenter is measured. In the Brinell, Vickers, and Knoop tests, the size of the indentation is measured instead.
The deeper an indenter goes into a material under a set load, the softer the material is. The Rockwell hardness (HR) is calculated based on the depth of the indentation, along with a few other factors.
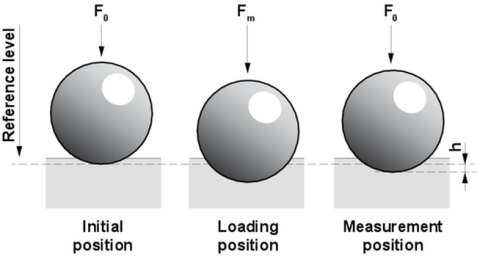
In Rockwell hardness testing, the total test force is applied in two steps. This helps reduce the effects of surface roughness (like grooves) and minimizes measurement errors caused by any movement in the indentation depth measurement.
Sequence of the Rockwell hardness test (HR) to ISO 6508:
1. Test step
First, the indenter is pressed into the specimen with a test preload until it reaches a depth called h0. This depth h0 serves as the reference point (or base) for measuring the permanent indentation depth later on.
2. Test step
Next, an additional test force is applied for a specified dwell time (usually a few seconds), causing the indenter to penetrate the specimen to the maximum depth, h1. The total test force, also known as the main load, is the sum of the test preload and the additional test force.
3 .Test step
At the end of the dwell time, the additional test force is removed. The indenter then moves back to its starting position by the amount of the elastic portion of the indentation (the part that is reversible), leaving the indenter at the permanent indentation depth h. This depth is measured in units of 0.002 or 0.001 mm. This difference between the indentation depth before and after the total test force is applied is called the differential depth. Using this permanent indentation depth h, the Rockwell hardness (HR) is calculated using a formula defined in the ISO 6508 standard, based on the specific Rockwell scale used.
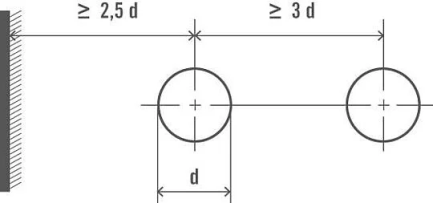
Minimum indentation and edge distance values for the Rockwell method
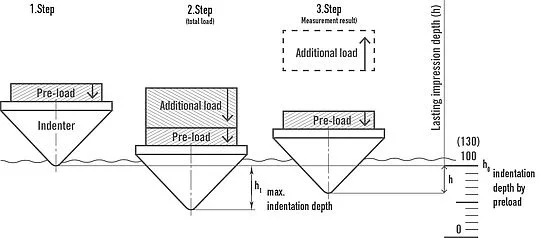
Rockwell hardness test steps
The test indentations must be placed with enough space from the edges of the specimen and from each other. The minimum required distances are specified in the diagram below. These distances are important to ensure accurate and consistent test results.
Advantages and disadvantages of hardness testing using the Rockwell method
The Rockwell method offers several advantages:
- No specimen preparation required: There’s no need for cutting, grinding, or embedding the specimen before testing.
- Direct hardness reading: The hardness value is displayed directly, without the need for optical evaluation (like measuring diagonals in optical methods).
- Quick and economical: The test cycle is short, and Rockwell hardness testers are cost-effective since they don’t require expensive optical systems, unlike Brinell, Vickers, or Knoop machines.
- Non-destructive: The test is non-destructive, meaning the specimen can be reused after testing.
The Rockwell method has the following disadvantages:
- Accuracy limitations: It may not always be the most accurate method. Even a small error in measuring the differential depth can lead to a significant mistake in the calculated hardness value.
- Cleanliness requirement: The test area must be free of dirt, debris, or contaminants (like scale, cinder, foreign bodies, or oil) to ensure reliable test results.
- Indenter wear: The indenter can affect the results, especially if it is worn or if the cone tip no longer meets standard requirements. It’s essential to use only certified and calibrated indenters to minimize these effects.
- Difficulty with harder materials: As materials become harder, it becomes more challenging to accurately differentiate between them using the Rockwell method.
Examples of Rockwell methods and applications
To achieve as broad an application range as possible for the Rockwell test, several methods were developed for both the Rockwell and the Super Rockwell processes.
The individual Rockwell methods are differentiated by:
- Type of indenter: This includes the material, shape, and size of the indenter (such as a steel ball or diamond cone).
- Magnitude of the total test force: This refers to the amount of force applied during the test, also known as the main load or total test force.
- Scale division: This is based on the reference point (h0) for measuring the residual indentation depth (h). The scale division is either 100 or 130 units, with each unit representing either 0.002 mm or 0.001 mm, depending on the specific scale used.
The Rockwell method utilizes five different indenters and six different total test forces, leading to a total of 30 different Rockwell scales. These are standardized according to ISO 6508 and ASTM E18. The indenters include:
- Diamond cone with a 120-degree curvature.
- Tungsten carbide balls with diameters of 1/16″, 1/8″, 1/4″, and 1/2″.
- The test forces used are: 15, 30, 45, 60, 100, and 150 kgf.
These variations create 30 distinct Rockwell scales (e.g., A, B, C, 30N, 15T) or Rockwell test methods (e.g., HRA, HRBW, HRC, HR30N, HR15TW). Each scale is suited for different hardness ranges and materials, making the Rockwell method versatile for many applications (see table for details).
The Rockwell method is often used as a quick and efficient test in production settings or laboratories, and also for processes like the Jominy end quench test. The most common Rockwell scale in practice is HRB and HRC.
Read Also : 5 Common Steel Casting Defects and How to Prevent Them
OVERVIEW OF TYPICAL APPLICATIONS FOR ROCKWELL HARDNESS SCALES
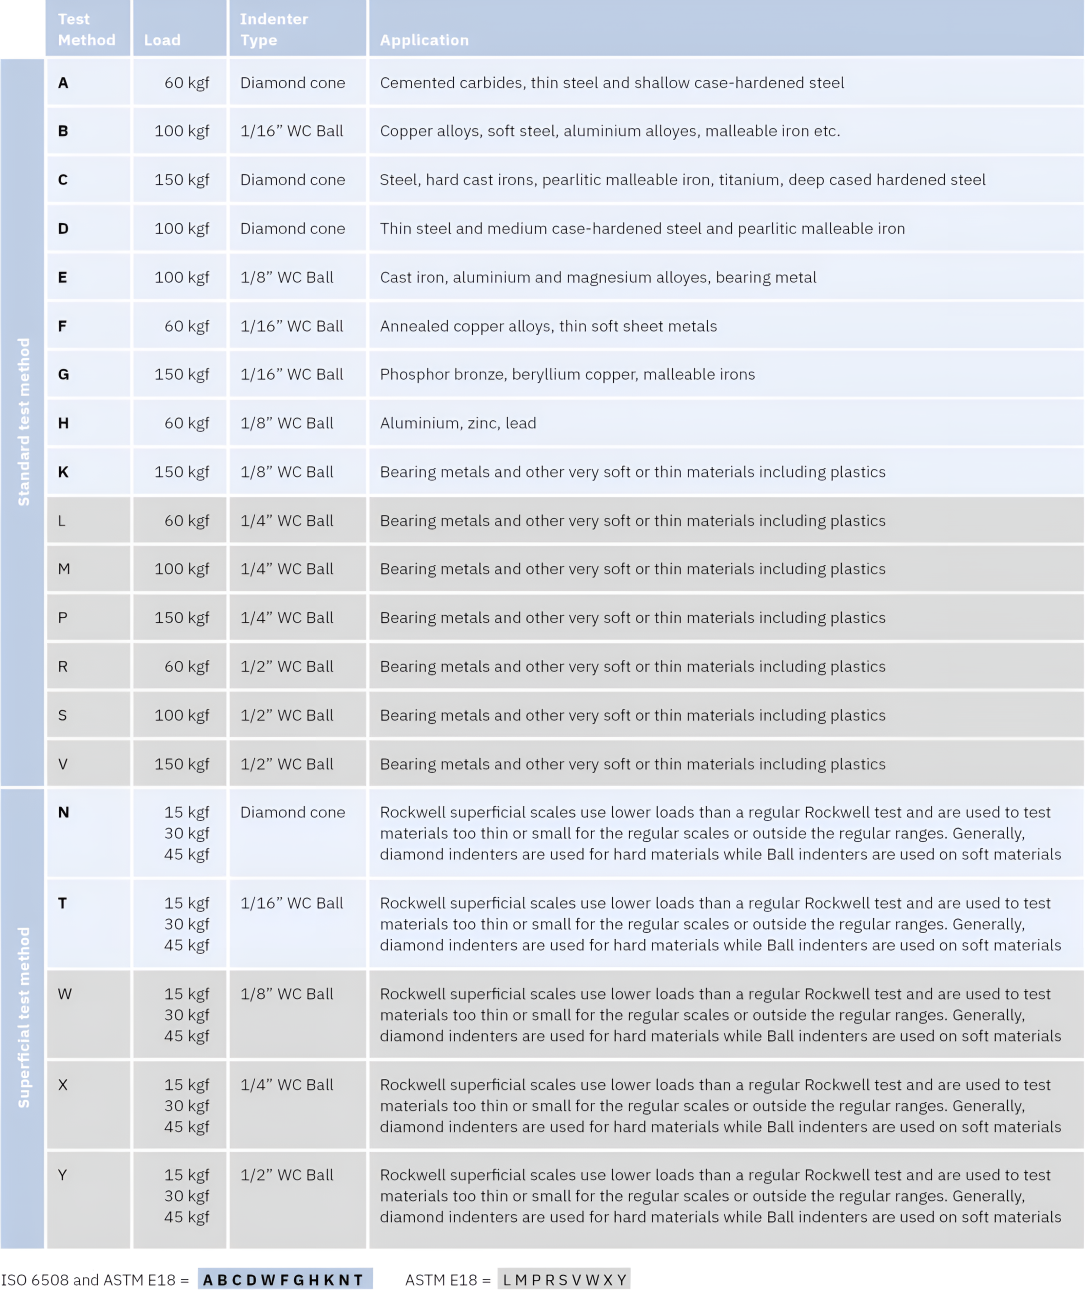
(Image credit: struers)
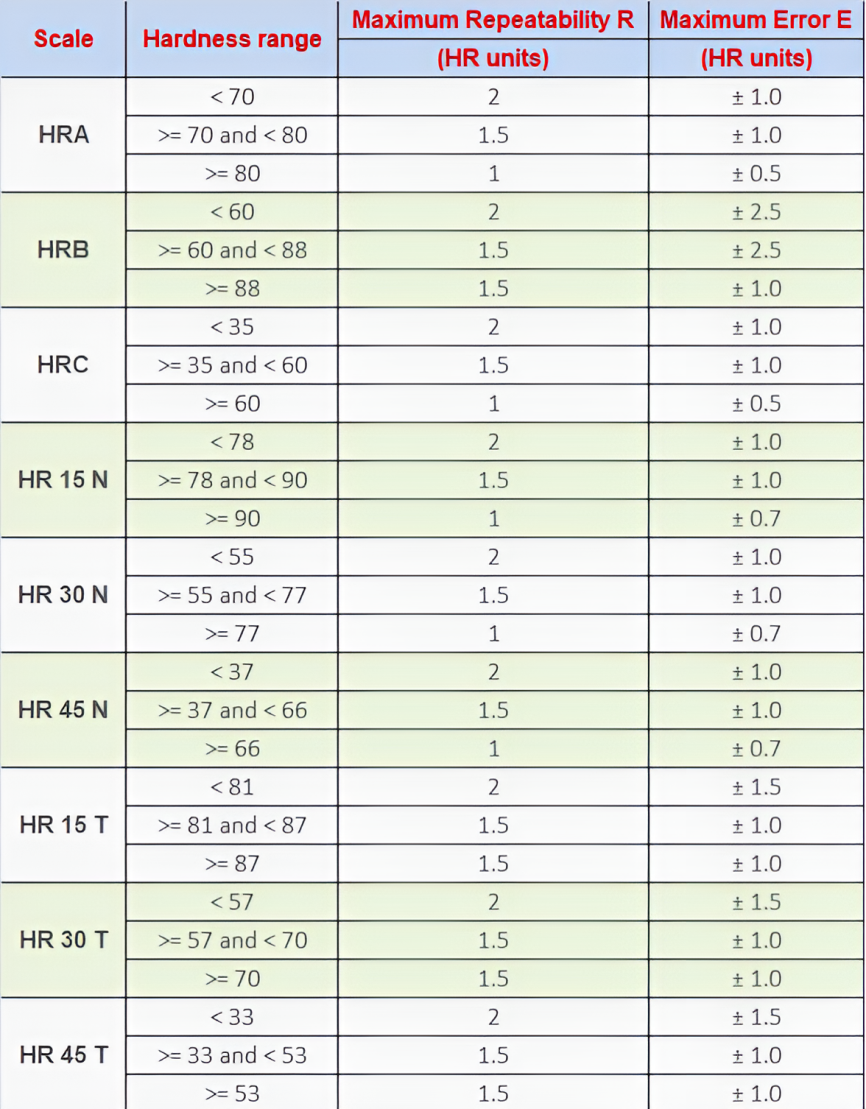
MAXIMUM ALLOWABLE REPEATABILITY AND ERROR
In general, ball indenters are used for softer materials, while diamond indenters are used for harder materials. This is because diamond indenters could destroy or pierce softer materials.
Various Standards for Rockwell Hardness Test Methods:
- ASTM E18
- IS 1586 (Part 1)
- ISO 6508 (Part 1)
Your product meeting right hardness requirements..?
You can discuss with our team for your product solution…